
STEP 1 – Connect to your modem via Wi-Fi or Ethernet
Ensure that Wi-Fi is enabled on the device you are using to access your modem (e.g. computer/laptop/smartphone/tablet). If you are using a smartphone or tablet, you should turn off your mobile data connectivity or any hotspot connection during this process.
Connect to the Wi-Fi/Wireless network of the NetComm NF10WV modem on your computer/laptop/smartphone/tablet. To connect to the Wi-Fi network of the NetComm NF10WV modem, locate the Wi-Fi network name being broadcast by the modem from your device (e.g. computer/laptop), select this network, then enter the password for this network when prompted.
If you are unsure of the Wi-Fi password, this will be printed on the sticker on the back of the NetComm NF10WV modem, underneath the barcodes.
PLEASE NOTE: YOU DO NOT NEED TO HAVE A WORKING INTERNET CONNECTION TO CONNECT TO THE WI-FI OF THE NETCOMM NF10WV MODEM OR ACCESS THE MODEM GATEWAY PAGE.
Alternatively, you can plug in an RJ-45 Ethernet cable from your computer or laptop to one of the four (4) yellow Eth ports on the back of the NetComm NF10WV modem.

STEP 2 – Log in to your modem
Open your web browser (e.g. Google Chrome/Internet Explorer/Mozilla Firefox/Microsoft Edge), enter 192.168.20.1 into the address bar and press Enter.
If successful, a login box or window should appear asking for a username and password. Enter admin for the username and admin for the password.
If this doesn’t work, the password will be printed on the sticker on the back of the NetComm NF10WV modem. Enter this password.

STEP 3 – Enter the Swoop settings into your modem
Once you have logged in, you will have several options listed along the left of the page. Click ‘Advanced Setup‘.

Then, click ‘WAN Service“.

A table will appear with the current saved services. Tick the Remove Box in the table for all rows shown, then click ‘Remove‘ underneath the table.

Now click ‘Basic Setup‘ along the left of the page. Select ‘Ethernet WAN‘ and then press ‘Next‘.

Choose the ‘PPP Over Ethernet (PPPoE)‘ option, then press ‘Next‘.

You will need to enter your Moose Mobile service username and password as follows:
User ID: [USERNAME]@moosemobile.com.au (your Moose Mobile service username would have been emailed to you during the order process)
Password: moose[YEAR OF BIRTH] (your Moose Mobile service password would have been emailed to you during the order process – this is NOT the same password as your Moose Mobile customer portal login)
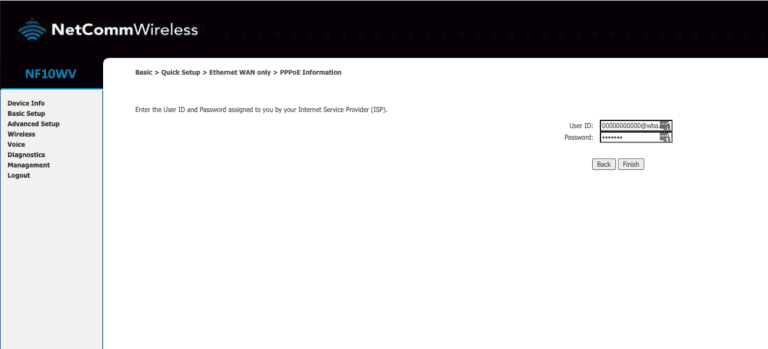
Press ‘Finish‘
STEP 4 – Plug your modem into the nbn™ device
You now need to plug your NetComm NF10WV modem into your nbn™ device using an RJ-45 Ethernet cable.
One end of the Ethernet cable needs to be plugged into the blue WAN port on the back of your modem and the other end into the active port on your nbn connection box – this will either be a numbered UNI-D port (such as UNI-D 1, UNI-D 2 etc.) or a GATEWAY port.
Try UNI-D Port 1 first, and then work your way through them if the first port doesn’t successfully connect you to the internet.
If you have configured and plugged in your modem correctly, both the WAN and Internet lights on the front of your modem should turn solid green. This may take up to five (5) minutes.
If the WAN and Internet lights do not turn solid after five (5) minutes, please contact our support team on 1300 66 55 75 for further troubleshooting.
